One day Mount Rainier National Park itinerary: How to plan your time + tips!
Do you only have time for one day in Mount Rainier National Park, or are you taking a day trip to Mount Rainier from Seattle, and wondering how to plan out your day? Our one day Mount Rainier itinerary is designed to cover as many highlights as possible in some of the best places in the park (Paradise and Sunrise!), though we will warn you: it will be a jam-packed day! But rest assured, even with just one day in Mount Rainier, you can still see and do a lot, and in this guide we’ll show you how, and give you all our best tips along the way.

Mount Rainier National Park is big, with five different regions, four separate entrances, and a ton of amazing hiking trails, sights, waterfalls, wildflower-filled meadows, and scenic drives that can fill up days (even weeks!) of any Mount Rainier itinerary.
But let’s face, we don’t all have that kind of time. And that’s okay! Many people visit Mount Rainier for just a day while on a quick road trip through Washington’s National Parks, and because of how close the park is to the city, many people even opt to take a day trip to Mount Rainier from Seattle. But, is one day in Mount Rainier really enough?
We think so! Of course, more time is always better, but if you only have one day to explore Mount Rainier, we think you should absolutely go for it because you’ll still get to see many of the park’s highlights and best views. To get the most out of your time, expect to have a jam-packed day, and come with plan…and hey, this is exactly where we come in!
In this guide, we’ll share what we think is a perfect itinerary for one day in Mount Rainier National Park based on our own experiences. Our itinerary is pretty packed and includes the best places to visit for those on a tight schedule who want to make the most of their day and see many of the park’s highlights. But if it seems a little too much, or you’d rather spend more time exploring just a single part of the park, we’ll also give you some suggestions of how to modify this itinerary to do just that! Plus, we’ll give you all the need-to-know info and tips for planning your one day in Mount Rainier.
So, let’s get to it!
In this guide to one day in Mount Rainier National Park:
Best Hikes in Mount Rainier National Park + Tips
Is One Day Enough for Mount Rainier National Park?
With one day in Mount Rainier, you can see a surprising amount of the park’s highlights!
First things first, let’s get this very common question out of the way…is one day in Mount Rainier really enough?
In an ideal world, of course more time is better. Mount Rainier is such a big park- there are five different regions spread pretty far apart from each other and it’s literally impossible to see it all in just one day.
But don’t worry- not all hope is lost for those of you short on time, and you can actually still see a surprising amount if you’re efficient, the weather is good, and you don’t mind a pretty long day. With one day in Mount Rainier, you’ll have to focus your time on just one or two regions of the park, but in each region you visit, you can spend time on a couple of trails, see a few highlights, and take in the epic views that Mount Rainier is so famous for.
With one day, you’ll just have to keep your fingers crossed that the weather is good and the mountain is out, and be prepared for a jam-packed day!
Can I do a day trip to Mount Rainier National Park from Seattle?
Yes! You can definitely do a day trip to Mount Rainier from Seattle. From Seattle to either Sunrise or Paradise (the two regions we focus on in our one day Mount Rainier itinerary), it’s about a 2.5 hour drive at a minimum (but you’ll likely have to account for some traffic). So keep in mind that you will be doing a LOT of driving and it will be a long day, but it is definitely doable.
Where to Spend Your One Day in Mount Rainier National Park
Like we said, Mount Rainier is big. There are five different regions found along the different sides of Mount Rainier, and driving between some of them can take up to a couple of hours. So, if you’re planning on just having one day in Mount Rainier, you’ll likely be picking 1-2 areas that really stand out to you to focus your time in, and then if you have extra time and don’t mind having a really full day, pick one more region close by to add on as a brief visit in your itinerary.
So which regions would we recommend visiting with just one day in Mount Rainier?
Well, there are two we would recommend.
Paradise: Paradise is the classic Mount Rainier destination, found along the southern slopes of the mountain. It’s the most popular place to go, especially for those who are visiting for the first time. It has the park’s main visitor center and facilities, but more importantly, it has gorgeous views of Mount Rainier, plenty of meadows famous for their colorful summer wildflowers, epic hiking trails, and lots of wildlife (like mountain goats, pikas, and marmots!). The only real downside to the Paradise area is that, because of how popular it is, it can get really crowded. But it’s crowded for good reason, and it’s still a must-see place in Mount Rainier.

Overlooking Paradise…can you see how it gets its name?!
Sunrise: Despite Paradise being the most visited and popular place in Mount Rainier, Sunrise was actually our personal favorite region of the park, found along the eastern slopes of Mount Rainier. Like Paradise, the views of Mount Rainier are incredible here, and there are plenty of hiking trails to get you to both in-your-face views and more further out panoramic vistas of the mountain. Even though it’s the second most visited region of the park, we thought the crowds here were able to spread out a little bit better than in Paradise, making the hiking a little bit more enjoyable for us.

The road into Sunrise
In our one day Mount Rainier itinerary, it will be a really full day because we’ll be taking you to both Paradise and Sunrise, with a quick visit to the Ohanapecosh (another smaller region in the southeast corner of the park) along the way.
What Mount Rainier National Park entrance is best?
There are four main entrances into Mount Rainier National Park, and for our one day Mount Rainier itinerary, three of them are relevant.
Nisqually Entrance: This is found in the Southwest corner of the park, and gives access mainly to Longmire and to Paradise from the west. This is the entrance to Paradise you’ll be using if making a day trip to Mount Rainier from Seattle or if spending the night before in Ashford. From this entrance, it takes about 45 minutes to drive to Paradise.
Stevens Canyon Entrance: This entrance gives access to Paradise from the Southeast corner of the park, and is the entrance you’d use when traveling between Paradise and Sunrise, or if staying in Packwood the night before. From here, it takes about 50 minutes to drive to Paradise.
White River Entrance: This is the entrance into Sunrise. From here, it takes about 40 minutes to drive to Sunrise.
To give you an idea of how big Mount Rainier is and how far apart different regions are from one another, here are some driving times between the different Mount Rainier entrances:
Nisqually to Stevens Canyon: One hour and 20 minutes
Nisqually to White River: About 2 hours
Stevens Canyon to White River: 30 minutes
Reservations for Mount Rainier National Park: What to Know
With only one day in Mount Rainier, you’ll need to do some advanced planning to make sure you can get views like these!
Because of the sheer number of visitors the park gets, Mount Rainier has instituted timed entry reservations for its two most popular areas, Paradise and Sunrise, which consequently happen to be the two areas we focus on in our one day Mount Rainier itinerary!
So, before you head out, there are some important things to know about Mount Rainier’s reservation system so that you can plan your day appropriately and secure the right reservations.
Reservations for Paradise
Required between May 24th and September 2nd for entry between 7 am and 3 pm
Advanced reservations are available at recreation.gov with the following schedule:
On February 21st 8 am PT reservations open for visits between May 24th-June 30th.
On April 1st 8 am PT reservations open for visits between July 1st-July 31st.
On May 1st 8 am PT reservations open for visits between August 1st-September 2nd.
Next day reservations are also available on recreation.gov starting on May 24th. These open up at 7 pm PT the day before, and are a good option for those planning a more last minute trip.
Paradise reservations are good for entry through both the Nisqually and the Stevens Canyon Entrances.
Reservations for Sunrise
Required between July 4th and September 2nd between 7 am and 3 pm
Advanced reservations are available at recreation.gov with the following schedule:
On April 1st at 8 am PT slots open for July 4th-July 31st.
On May 1st at 8 am PT slots open for August 1st- September 2nd.
Next day reservations are available on recreation.gov starting on July 3rd. These open up at 7 pm PT the day before your planned visit.
Sunrise reservations are good for entry through the White River Entrance.
General Mount Rainier reservation tips
Reservations cost $2 each and are per vehicle, not per person.
A reservation is good just for one day, and only for one area, either Paradise or Sunrise (i.e. you can’t use one reservation to get into both areas- you’ll need to secure each one individually).
Reservations are timed entry, meaning you’ll select a two hour window for when you can enter the park, and you can stay in the park and/or come and go as you wish for the rest of the day.
Reservations are bound to go pretty fast when they open! We highly recommend having an account already made on recreation.gov and being logged on and ready to go before the reservations open for the day to increase your chances of snagging one on a date you prefer! If you weren’t lucky, keep checking back on the reservation site to see if you can find any cancellations, which get released back into the system immediately.
Be sure to print your reservation or save it to your phone ahead of time before coming to the park (you won’t be able to rely on having cell service to pull it up from your email to show rangers at the gates).
How to plan a day in Mount Rainier with reservations
If you plan to follow our main one day Mount Rainier itinerary and visit both Paradise and Sunrise, a good strategy would be to go for one reservation for the day (wherever you want to spend the most time). Head to that area first with your reservation and spend all morning and mid-afternoon there. Then, plan to get to the second area just after 3 pm or so when reservations are no longer required for the day. That way, you can visit both regions in one day with only one reservation required.
If you just want to visit either Paradise or Sunrise, then it’s pretty straightforward and you’ll want to simply try your luck at that specific reservation.
In either case, you’ll want to aim for getting the earliest timed entry you can get (the 7 AM- 9 AM entry window) in order to make the most of your one day in Mount Rainier. If you can’t get an early timed entry, we recommend trying to get to the park entrance before 7 AM instead, when reservations aren’t yet required for the day. This might be harder and a little more painful to do if you’re planning a day trip to Mount Rainier from Seattle since you have a long drive to get there, but if you’re staying near the park, it’s a bit easier. Tip! Be sure to get there well before 7 AM in case any lines form at the entry gates! If this is what you plan to do, you can shift the times we list in our itineraries up a bit.
Can’t get Mount Rainier reservations at all?
The best thing to do if you couldn’t score a reservation is to plan for your one day in Mount Rainier outside of the reservation window. While visiting in the spring before reservations start for the summer may be tricky (certain access roads may still be closed and there will still be a lot of snow on the trails), visiting in September is a great option.
Also, if you’re able to stay in a campground or lodging within Paradise or Sunrise the night before your day in the park, then your accommodation reservations double as your reservation into that part of the park for as long as you are staying there…a win-win! These can be difficult to snag, too, though.
Cougar Rock Campground in Paradise has sites for reservation (6 months in advance on recreation.gov) and some first come first served sites. A camping permit here will get you into the Paradise corridor without the need for timed entry reservations.
White River Campground in Sunrise is a first come first served only campground, but if you can get a site here, you can access Sunrise without a timed entry reservation.
Lodging at the National Park Inn in Longmire or at the Paradise Inn in Paradise will allow you to access the Paradise Corridor without a timed entry reservation.
Best Time to Spend One Day in Mount Rainier National Park
The best time to visit Mount Rainier is from around early to mid-July through to the end of September. This Mount Rainier itinerary assumes this is when you’ll be visiting because during this time, the trails are likely to be pretty snow-free, and all access roads into Paradise and Sunrise should be open.
July and August are the peak summer months and the most crowded time in Mount Rainier. Expect lots of people, and also lots of bugs during the early part of the summer! But, you’ll also be treated to the summer wildflowers that bloom in meadows all throughout Paradise and Sunrise.

Mount Rainier wildflowers
Note: Even though it’s summer, high elevation trails in Mount Rainier can hold onto snow well into July, so be prepared to have to hike across a few snow patches. For more on what to expect and what to pack for hikes in Mount Rainier, check out our Mount Rainier hiking guide!

Lingering snow in Paradise in July
Early fall is still a great time to visit Mount Rainier for several reasons. The bugs are gone, the crowds are slightly smaller, you won’t need to deal with having to secure any timed entry reservations, and summer wildflowers are replaced with a colorful fall underbrush. Just make sure to check the weather and road conditions before heading out, as things start getting unpredictable this late into the year.
One Day Mount Rainier Itinerary: Paradise and Sunrise
Now that we’ve gotten most of the logistics out of the way, let’s get into the good stuff! Here’s our recommended way to spend one day in Mount Rainier National Park.
This itinerary can be done a bit differently depending on whether you are taking a day trip to Mount Rainier from Seattle, or if you are staying in or near the park the night before.
If you plan on staying near the park, we recommend staying in one of the following:
Ashford: This town is just outside the Nisqually Entrance in the southwest corner of the park. It will take about 45 minutes to get to Paradise (the first destination of the day) from here via Longmire. You can also stay at the National Park Inn. This is lodging found in Longmire, and will be about a half hour from Paradise. This is a good area to stay if you just plan on spending the night before near the park and then continuing on to your next destination at the end of the day.
Packwood: This town is outside of the Stevens Canyon Entrance in the southeast corner of the park. This is one of the few places to stay that’s in between Paradise and Sunrise, making Packwood a good base if you plan on spending the night before and the night after near the park before moving on.
Ohanapecosh: This is a region near Packwood and the Stevens Canyon Entrance. You can stay at the Ohanapecosh Campground, which is reservable up to 6 months in advance, or there are some first come first served sites you can try for. You’ll be about 45-50 minutes from Paradise, and an hour and half from the Sunrise parking lot, so again, it’s a good in-between place to stay if you want to spend the night before and after near the park. There are also nearby campgrounds run by the Forest Service as well.
In Paradise: The Cougar Rock Campground is only about 10 minutes from Paradise. It’s reservable up to 6 months in advance, but there are also some first come first served sites. The Paradise Inn is super ideal, as it’s right in the main Paradise parking lot and right at the doorstep to all the amazing hiking trails there. Either of these is a great place to stay to get an early start to your day.
8:00 AM: Arrive in Paradise
If you’re driving to Mount Rainier from Seattle, this will be a little painful and will require at least a 5:30 AM start time on the road, depending on traffic. But we do recommend getting here early to make the most of your one day in Mount Rainier and to snag a good parking spot in Paradise!
From Seattle (or Ashford), you’ll drive through the Nisqually Entrance and take Paradise Road through Longmire and up to Paradise. We suggest making a super quick stop at Christine Falls near Longmire along the way. This is a small roadside waterfall that you’ll actually drive over on a small bridge. Instead of stopping on the bridge, pull over in the small pull off area just past the bridge on the right side of the road and walk the short path down to a great viewpoint of the waterfall framed perfectly by the picturesque stone bridge.
If driving from Packwood or Ohanapecosh, head into the Paradise corridor via the Stevens Canyon Entrance. The road to Paradise from here gets scenic as it travels up along the canyon, with roadside waterfalls cascading down the rock walls and occasional views out to Mount Rainier. Take some time to stop at some quick pulloffs for pictures, but otherwise, head straight to the parking lot in Paradise to guarantee parking.

Mount Rainier peeking through the clouds as we drove up Stevens Canyon Road to Paradise
In Paradise, the main upper lot is where you’ll want to try to park- this lot has the visitor center, lodge, and main trailhead for the Paradise area. But if there’s no space here, you can park at the lower lot just before it, or there is overflow parking along the side of Paradise Valley Road just past the upper lot.

The main parking lot and visitor center in Paradise
8:00 AM – 12:00 PM: Hike in Paradise
Paradise is known for its beautiful meadows, wildflowers, and views of Mount Rainier, and there is a whole intersecting trail system that brings you through it all. So strap on your hiking boots and choose one or two trails to explore the area! We suggest spending about four hours here, which will give you enough time for one longer trail or a couple of smaller ones.
The main hike in Paradise is the famous Skyline Loop Trail. This 6.4 mile loop trail takes you through a large section of Paradise, through meadows, past amazing views of Mount Rainier and the Nisqually Glacier, and up into the rocky and rugged alpine environment along the southern slopes of the mountain. You’ll also hike by two popular highlights in Paradise- Panorama Point, which gives a great view over the entire Paradise area and the Tatoosh Range, and Myrtle Falls, a famously picturesque waterfall backdropped perfectly by Mount Rainier.

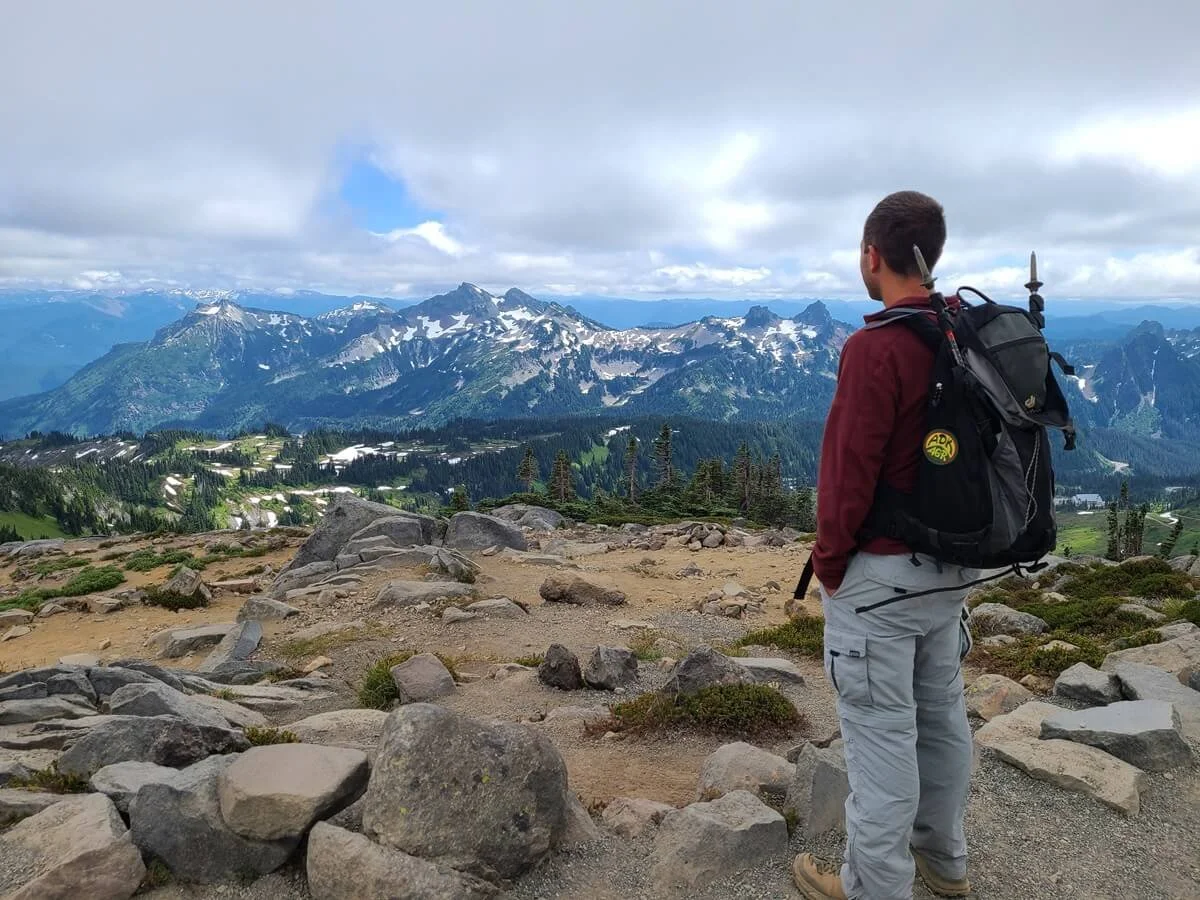
Looking over Paradise from the Skyline Trail- a must-do with one day in Mount Rainier!
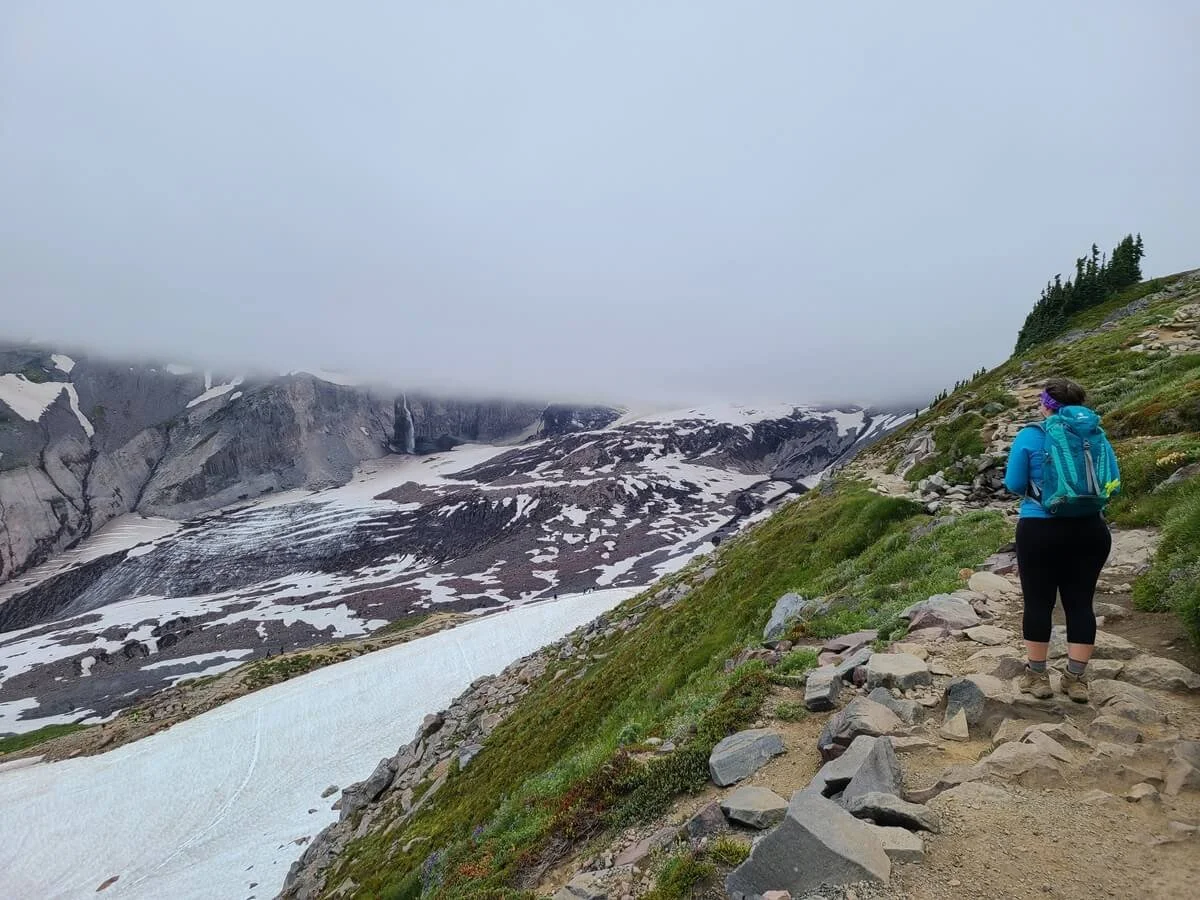
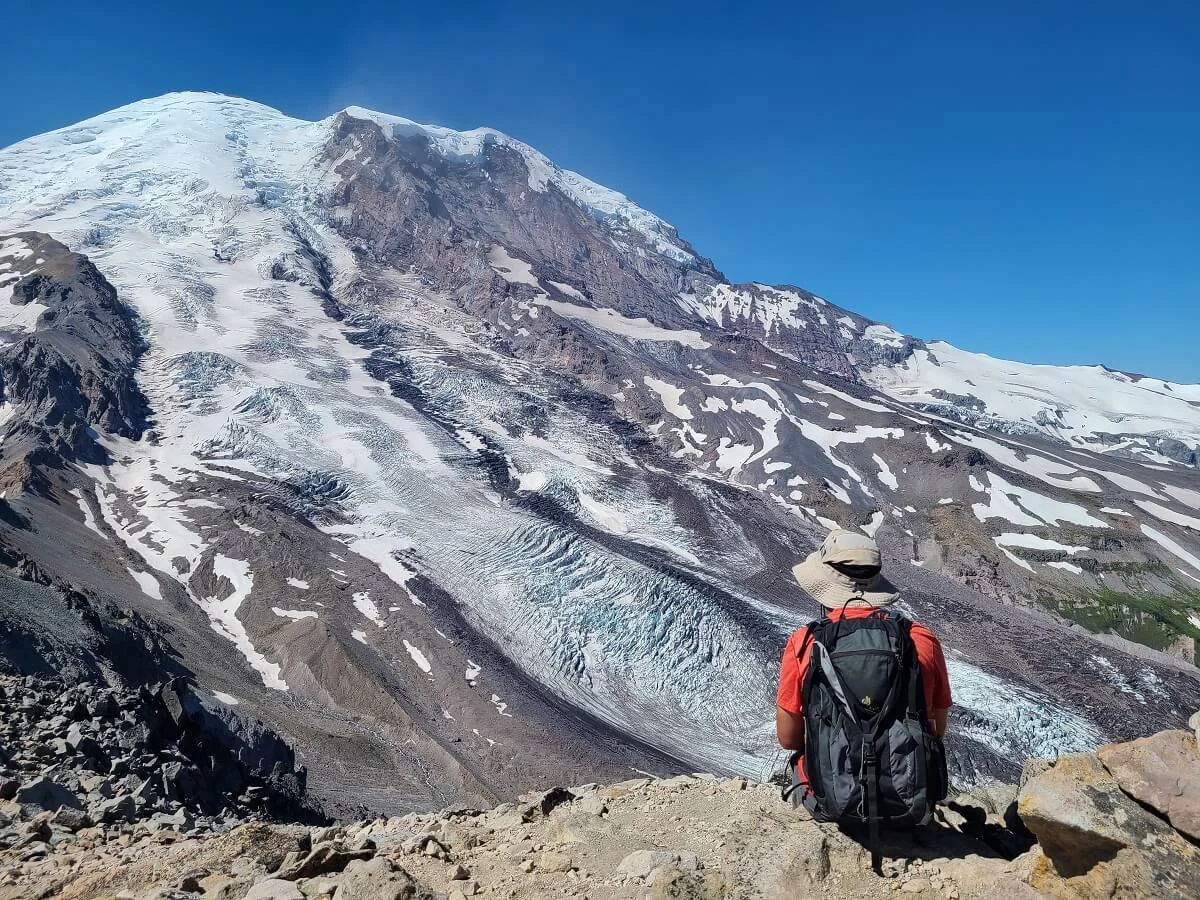
Along the Skyline Trail, you’ll get in-your-face views of Mount Rainier…if the weather cooperates! We just saw the base of the mountain, its waterfalls, and the Nisqually Glacier.

Keep your eyes out for marmots and other wildlife in Paradise!
Along the way, expect to see colorful wildflowers, in-your-face views of Mount Rainier, and lots of wildlife (like marmots and mountain goats!). But, also expect a lot of people (hopefully by getting an early start here, you can get a little bit ahead of the crazy crowds!).
The Skyline Loop Trail is a beautiful hike that will take up most of the four hours you will be in Paradise, but it’s a great one for seeing a lot of the highlights in this area. However, despite how popular this loop is, it shouldn’t be underestimated- it involves rocky and rugged terrain, some steep climbing, and frequent snow patches that you’ll have to cross (these linger will into late July usually).
If the full Skyline Loop Trail doesn’t sound like something you want to tackle, there are several shorter variations of the hike that you can do that will still allow you to get tons of great views. Some options include:
Hiking out and back to Panorama Point, which will cut down the hike to 4 miles
Hiking out and back to Glacier Vista. This shortens the trail to 3 miles, and brings you to a great viewpoint of the mountain and glacier while avoiding the most rugged and rocky portions of the Skyline Loop.
Hike out and back to Myrtle Falls. This is a quick and easy 1 mile round trip hike on a paved path to the scenic waterfall.
Nisqually Vista Trail. This easy loop is a 3 mile paved walking path that starts from the lower parking lot in Paradise. It’s not part of the Skyline Loop at all, but it’s great for those who don’t want a huge hike but would still like to get some walking in with great viewpoints out to Mount Rainier.
The view over Paradise from Panorama Point

Myrtle Falls (on a clear day, you’ll also see Mount Rainier!)
For more about the different hiking options around Paradise, check out our guide to the Skyline Loop Trail, which goes over the entire loop trail and all the ways to modify and shorten it.
With whatever hikes you decide to do up here, we promise you won’t be disappointed- you’ll get to experience all the elements that make this area of the park so well-loved and visited.
12:00 PM – 1:00 PM: Make quick stops around Paradise
Next up on this one day Mount Rainier itinerary, you’ll explore some quick highlights near Paradise, giving your legs a break and giving you a chance to eat some lunch!
Once you’re done on the trails, hop in the car and continue driving along the scenic Paradise Valley Road until you’re back on the main road. From here, we suggest making a couple of quick stops while you’re in the area:

Paradise Valley Road (here you can also see the overflow of cars parked along the road)
First, head towards Longmire (west on Paradise Road) for about 8 minutes until you reach the turn off for Rickseeker Point on your left. Stop here for picturesque views back towards Mount Rainier.
Next, starting driving back east towards Ohanapecosh. Make a quick stop at Narada Falls, where you’ll climb down a short but steep path to view the nearly 200 foot waterfall.
Finally, just a few miles further east, make a stop at the famous Reflection Lake. On a clear calm day, Mount Rainier reflects beautifully on the water’s surface. But even without the reflection, the view of the mountain is great from here. Stop here to snap some pictures and eat lunch with a view.
1:30 PM – 3:30 PM: More hiking around Paradise or explore Ohanapecosh
Exploring Ohanapecosh on the Grove of the Patriarchs Trail
With only one day in Mount Rainier, you’ll have to make some decisions. Do you want to keep exploring more of the Paradise area and keep getting those epic Mount Rainier views? Or would you rather explore a different part of the park and experience a more peaceful forest kind of vibe? Either way, you’ll strap your hiking boots back on and hit some more trails!
If you want to stay up in Paradise a bit longer (and we don’t blame you…it’s called Paradise for a reason!), then you’ll have time to tackle one more trail in the area. The two that we would choose from (yes, a choice within a choice…choice inception!) are:
Pinnacle Peak saddle: This 2.5 mile out and back hike climbs a steep 1,000 feet to the saddle of Pinnacle Peak from which you get an amazing view over Paradise and Mount Rainier. You can continue up to the summit of the peak, but it’s more of a scramble up loose shale and rock, so most people will stop at the saddle. The Pinnacle Peak trailhead is right across the street from Reflection Lake.
Bench and Snow Lakes: This is another 2.5 mile trail just a bit further east down the road from Reflection Lake. You’ll climb about 700 feet across rolling terrain to two beautiful blue subalpine lakes. The first, Bench Lake, has a view of Mount Rainier similar to Reflection Lake, while Snow Lake has a beautiful deep blue color and rugged mountain backdrop.
If you’d rather give yourself a break from the more challenging hikes and experience a different part of the park, then head to Ohanapecosh. From the main Paradise area, it will take about a half hour to get to Ohanapecosh near the Stevens Canyon Entrance.
In Ohanapecosh, views of Mount Rainier are nonexistent. Instead, it’s more about the peaceful experience of walking through old growth forest along streams and rivers. There are two easy trails you can hike along.
The two trails in Ohanapecosh we recommend are:
Grove of the Patriarchs: This is an easy and flat 1.6 mile hiking trail that crosses the Ohanapecosh River on a suspension bridge and brings you to an island that contains old growth forest, with some trees as old as 1,000 years.


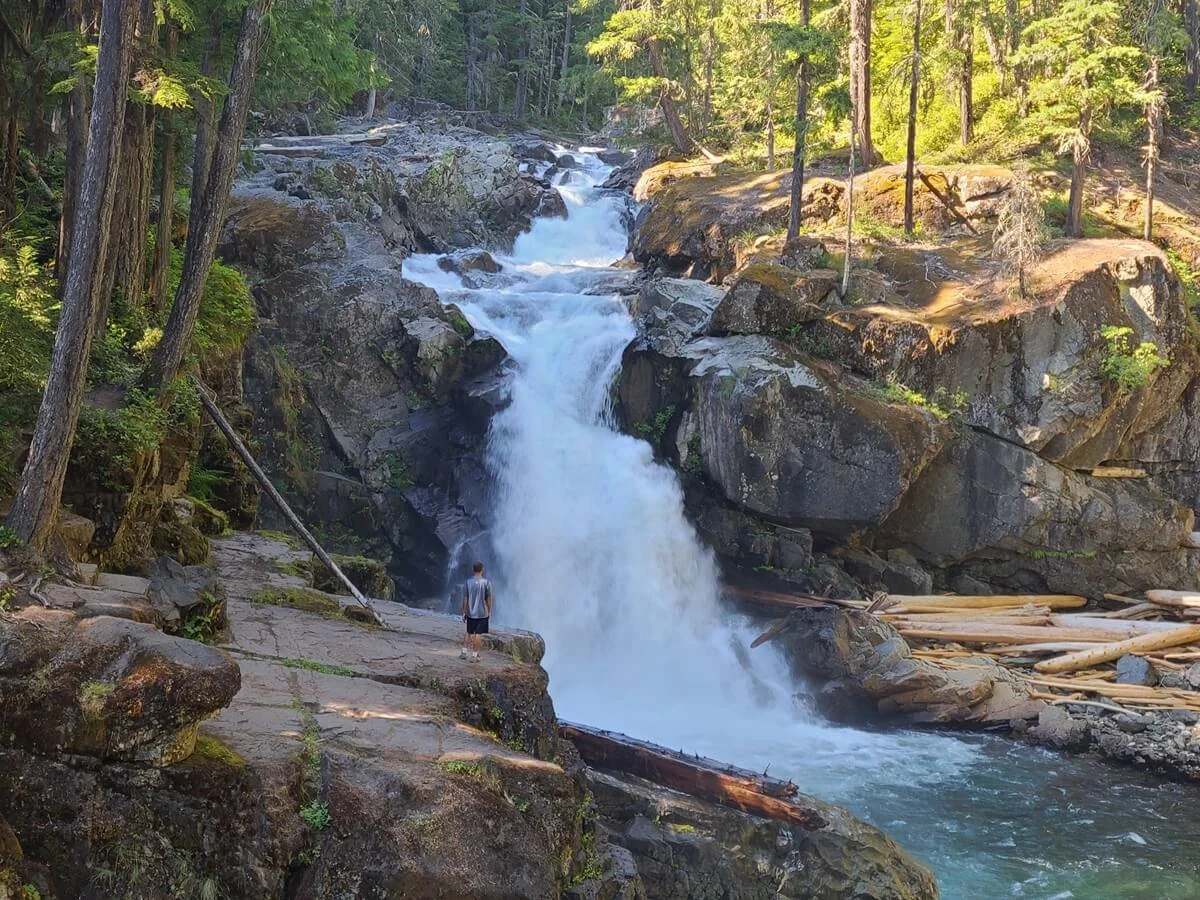
Silver Falls: This short and easy hike brings you through quiet forest to the small but powerful Silver Falls. There are a few ways to approach the falls, but we recommend taking the East Side Trail that starts just across the street from the Grove of the Patriarchs.

Silver Falls in Mount Rainier

Hiking along the Silver Falls Trail
4:00 PM – 4:30 PM: Tipsoo Lake
From Ohanapecosh, it’s time to make your way to Sunrise, finally! Along the way, we do recommend making a quick detour to Chinook Pass. When you get to WA-410 at Cayuse Pass, instead of heading west to Sunrise, head east for about three miles or so. This road climbs a few scenic switchbacks as it heads up to the pass.

The road to Chinook Pass near Mount Rainier
While the drive is pretty, the main reason we recommend this short detour is to visit Tipsoo Lake, which is found right at the pass. This small lake is a super popular place to visit in Mount Rainier. It’s beautifully backdropped by Mount Rainier in the distance and is surrounded by colorful meadows in the summer, giving it that quintessential Mount Rainier feel.

Tipsoo Lake
Keep your fingers crossed that a spot is open in the small lot near the lake. Otherwise, you can park in pulloffs along the road or in small lots further up and walk down.
There is a very popular trail that begins here called the Naches Peak Loop Trail. This trail wraps around Naches Peak as it weaves and climbs through wildflowers and meadows and past several subalpine lakes. It’s recommended to hike the loop in a clockwise direction so that the views of Mount Rainier on the back half the hike are ahead as you make your way back to Tipsoo Lake.
We personally think that if you only have a day in Mount Rainier and are trying to cover a lot of ground, this hike is skippable. It’s a beautiful and relatively easy hike, but we think the hikes in Paradise and Sunrise are more worth your time. You can get some of the best views from the trail right at Tipsoo Lake, so we recommend exploring the lake, snapping a few pictures, and heading to Sunrise.
5:30 PM: Arrive in Sunrise
From Chinook Pass, it’s going to take almost an hour to get all the way up to the main Sunrise parking lot. After passing through the White River Entrance, a 14 mile road switchbacks it way up out of the forested valley as it climbs nearly 3,000 feet to Sunrise. Towards the top, views of Mount Rainier open up, making this an incredibly scenic drive. Be sure to stop at Sunrise Point to snap some great pictures along the way. By the time you reach the Sunrise lot, you’ll be at 6,400 feet, the highest point in the park that you can drive to.

Views from the road as you get close to Sunrise!

A view of the Sunrise parking lot and visitor center- definitely one of the best places to spend one day in Mount Rainier!
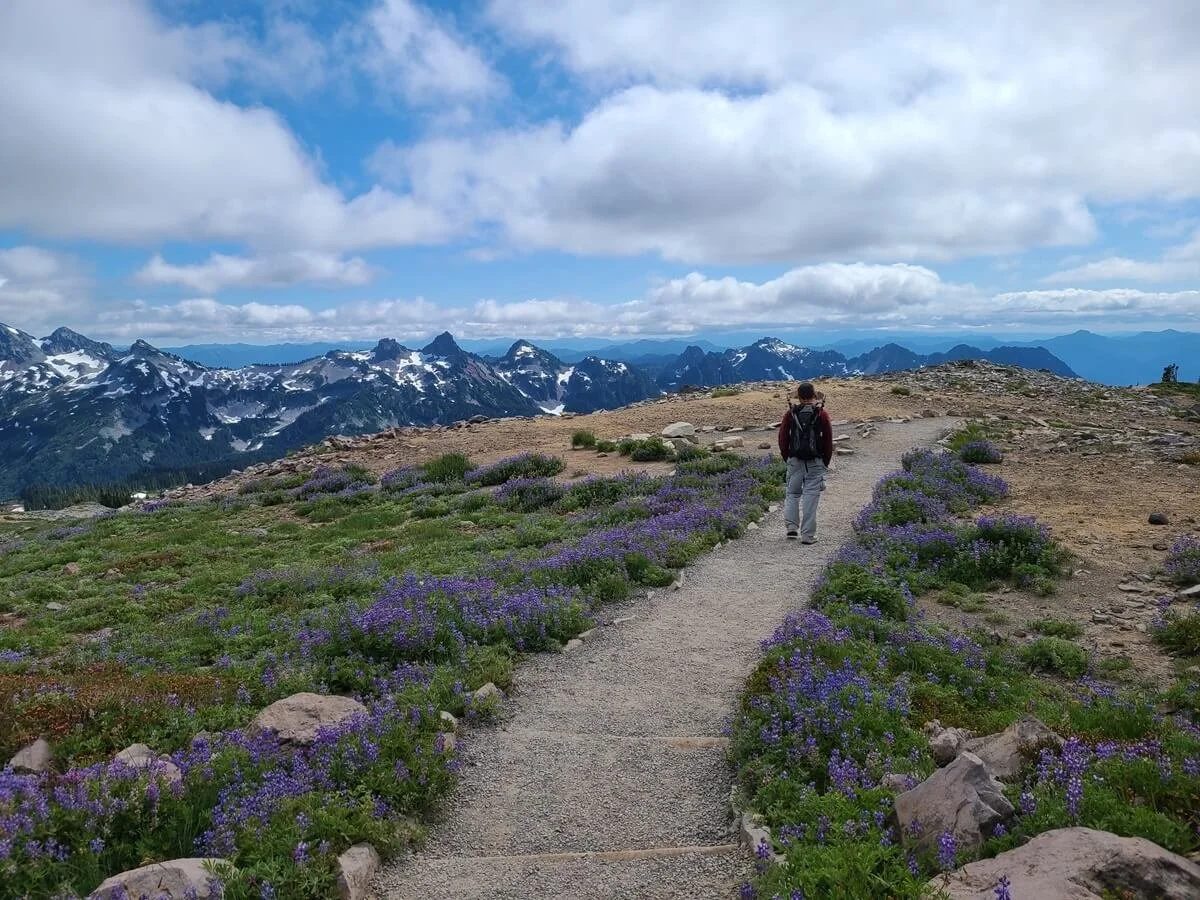
Just from the lot alone, views of Mount Rainier are incredible, so you know the hiking here is going to be good. A network of intersecting trails weaves its way through wildflower-covered meadows and past subalpine lakes to epic in-your-face views of Mount Rainier, and it will be hard to choose which one you want to do! But no matter which ones you choose, it will certainly be an epic way to end your one day in Mount Rainier.
Even though you’re getting here kind of late, you should have time for one hike. Ironically, given its name, sunsets are amazing in Sunrise, so if the weather is clear, you’ll get some awesome alpenglow on Mount Rainier from the trail.
If we had to choose one hike for sunset, it would definitely be the Mount Fremont Lookout Trail. This hike is not too challenging or long, but the views of Mount Rainier are essentially non-stop. The trail leads to a fire tower with an awesome view of the mountain for sunset (or at any time of day really!).

Some of our favorite views of Mount Rainier were on the Mount Fremont Lookout Trail!
If you’re looking for other options, or have more time to hike in Sunrise after skipping other parts of this itinerary, check out our Mount Rainier hiking guide. Some ones we recommend checking out include:
The Burroughs Mountain Loop Trail- This was our favorite Mount Rainier hike! On this trail, you can hike to three different viewpoints of Mount Rainier, each one more epic than the last!

Hiking along the Burroughs Mountain Trail in Mount Rainier
Dege Peak- This moderate hike takes you along a scenic ridge and up a steep spur trail to the summit of Dege Peak, from which you get amazing panoramic views over Sunrise and Mount Rainier.

Hiking back to Sunrise from Dege Peak
9:00 PM: Leave Mount Rainier
That’s a wrap on your one day in Mount Rainier! We know, it’s a long one, but trust us when we say it’s totally worth it. In one day, you will have seen two of the best areas of the park (and maybe one extra if you stop in Ohanapecosh!) and will have hiked on some of the most scenic trails.
If you’re staying in Packwood or Ohanapecosh, it will be about an hour and half back to your accommodations.
If you’re on a day trip to Mount Rainier from Seattle, it’s going to be another 2.5 hours of driving, making it a late night. This is why we recommended skipping one element of this itinerary so that you can get home at a decent hour! If there’s one thing we’d skip to shorten this itinerary up, it would be the additional hike in Paradise/the visit to Ohanapecosh. This should shorten the itinerary up by about 2 hours or so, and you can leave the park around 7:00 PM.
How to modify this one day Mount Rainier itinerary
We know our itinerary is pretty packed. It’s how we like to do things, but we know it’s not for everyone! If you want to have a more relaxing day in Mount Rainier and not try to squeeze everything in, we’ve got your back!
To shorten our itinerary above, this is how we would change it up:
Spend less time in Paradise. Instead of hiking for four hours from 8 AM – 12 PM, only hike for two to three hours. Then head to Sunrise. The itinerary would look something like this:
8 AM – 11 AM: Hike one or two shorter trails in Paradise
11 AM – 12 PM: Visit Rickseeker Point, Narada Falls, and Reflection Lake
12:30 PM- 1:30 PM: Hike the Grove of the Patriarchs Trail and/or to Silver Falls in Ohanapecosh
2:00 PM- 2:30 PM: Visit Tipsoo Lake
3:30 until whenever: Hike in Sunrise
If you’d rather just focus your time in one region of the park instead of trying to squeeze in both Paradise and Sunrise, this is what we would recommend:
One day in Paradise itinerary
8 AM- 12 PM: Hike in Paradise (Skyline Loop Trail recommended!)
12 PM – 1 PM: Visit Rickseeker Point, Narada Falls, and Reflection Lake
1 PM – 3:30 PM: Hike to either Bench and Snow Lakes, or to Pinnacle Peak saddle
4:30 PM – 6 PM: Explore Ohanapecosh
6:30 PM – 8 PM: Visit Tipsoo Lake for sunset. Hike the Naches Peak Loop Trail if you have the time and energy before sunset.
One day in Sunrise itinerary
8 AM – 12 PM: Choose a couple trails to hike in Sunrise
12 PM – 1 PM: Have a picnic lunch in Sunrise, or head to the Crystal Mountain Resort. You can ride a gondola up to a restaurant with a beautiful view of Mount Rainier.
1:30 PM -3:30 PM: Explore Ohanapecosh
4 PM- 6:30 PM: Hike the Naches Peak Loop Trail and stay at Tipsoo Lake for sunset
Tips for Spending One Day in Mount Rainier National Park
Mount Rainier entry fees and reservations
We’ve talked about reservations before, but we will just emphasize again that if you are spending just a day in Mount Rainier, we highly recommend getting the first set of reservations for the day, or get there well before the 7 AM reservation start time. For our one day itinerary, you’ll be trying for reservations for Paradise. This way, you’ll visit Paradise first thing in the morning, and then by the time you arrive in Sunrise, you won’t need a reservation because it will after the cutoff.
If you couldn’t get a reservation, and you have to come before 7 AM, we highly suggest you consider staying closer to the park instead of trying to do a day trip to Mount Rainier from Seattle. Lines at entry gates for those without reservations might be long, and you’ll likely need to get there well before 7 AM to ensure you can get through before the 7 AM cutoff. Consider driving down to Ashford from Seattle the night before and spending one night so you can get to the entry gate at a reasonable time without having to wake up at 3 AM! This is particularly relevant for summer weekends…if you visit on a weekday it will probably be a little easier to get in.
Regardless of whether you need reservations or not, you will still have to pay a park entry fee. This costs $30 per vehicle. You can buy one at the park gates or online in advance (make sure to print and bring with you!).
Tip: If you plan on visiting more National Parks, consider buying the America the Beautiful National Park pass, which will get you into all National Parks and federal recreation areas for a full year! In Washington, this can get you into Olympic National Park, the Enchantments, Mount Baker, and more.
Check road and trail conditions
If you only have one day in Mount Rainier, you’ll definitely want to make sure all access roads and trails you’re interested in are open and accessible. Check the road status and trail conditions pages on the NPS website. This is particularly important if you plan to visit in the spring or fall, when conditions are more variable. Many access roads close for the winter, and snow can linger on trails for a while.
Check the weather and be flexible
This is an obvious one, but you’ll want good weather for hitting the trails and getting those amazing views of Mount Rainier. But we just want to temper your expectations just a tad bit here- because even if the forecast is looking good, it doesn’t always mean Mount Rainier will be out. We definitely learned this the hard way ourselves! Despite a few sunny forecasts, Mount Rainier made its own weather and remained in clouds…in fact, we could barely tell the mountain even existed when we were in Paradise! We like using this website for checking mountain weather, because it gives you the forecast at different elevations, and you can always check the webcams of the different areas of Mount Rainier before heading out. Hint: Just because the mountain is hiding in one area doesn’t mean it’s hiding in another! Different sides of the mountain get different weather and cloud cover, so if it’s hiding in Paradise, it might still be out in Sunrise! You may have to make some last-minute itinerary changes if this is the case (i.e. switch from our main one Mount Rainier itinerary to the Sunrise only itinerary).
What to bring to Mount Rainier
Check out or Mount Rainier hiking post for more specific things to bring on the trails, but for a general visit to Mount Rainier, we’d recommend having:
A good pair of hiking boots or shoes- You’ll be doing lots of hiking, and some trails can be rocky and rugged.
Layers- You’ll be going up and down to different elevations, so even if it’s a warm sunny day out, you might get chilled on some of the higher elevation hikes.
Sun protection- Many Mount Rainier hikes outside of Ohanapecosh are above treeline and exposed.
Bug spray- Especially in the early summer months, flies and mosquitoes can be pretty bad here.
A packed lunch and plenty of snacks- There are limited places for food inside the park, so we recommend bringing your own lunch and picnicking somewhere with a view.
A water jug- Keep it in your car and refill when you can (at visitor centers) and make sure you bring plent of it with you on the trails.
All passes, reservations, and maps for driving/hiking downloaded to your phone- You can’t rely on cell service here, so make sure you have saved everything to your phone or printed it all out before coming.
Binoculars or a good zoom lens- There is tons of amazing wildlife here (mountain goats, marmots, pikas, and more!) but it’s important to stay on all trails and don’t approach any of the wildlife, so having a way to get a good look without approaching the animals is always a good thing.
Fill up your tank when you can
There are no gas stations inside the park, so fill up in Ashford, Packwood, or Greenwater as you pass through (and expect some higher prices than you may be used to seeing!).
Leave your furry friend at home
Unfortunately, dogs aren’t allowed on the trails in Mount Rainier, so it’s best to leave them home if you plan to do a lot of hiking.
More Mount Rainier National Park Guides
Heading to Mount Rainier for a day and want more information on some of the trails we mentioned above? Check out all our Mount Rainier guides to help you plan for your trip!
Best hikes in Mount Rainier National Park
Skyline Loop Trail in Mount Rainier National Park: Complete Trail Guide
The Burroughs Mountain Trail in Mount Rainier National Park: Complete Trail Guide
The Mount Fremont Lookout Trail: Complete Guide
Hiking to Dege Peak in Mount Rainier National Park
How to Hike to Tolmie Peak Lookout in Mount Rainier National Park
And if you think you want to plan for more than one day in the park, check out our 3 day Mount Rainier itinerary and guide to see how we would recommend planning your time.
More Washington Travel Guides
If you’re on a Washington road trip, we have a bunch of guides on more places to see in the state!
NORTH CASCADES NATIONAL PARK: The Hidden Lake Lookout Trail
MOUNT BAKER WILDERNESS: Check out all our favorite hikes near Mount Baker
Are you planning to spend a day in Mount Rainier National Park? Let us know your questions! And be sure to come back and tell us how it went. Happy travels!